How to make a Wing Chun wooden dummy
Make a professional Wing Chun’s training dummy (Muk Yan Jong)
After having seen what Wing Chun’s wooden dummy is (read The Wing Chun dummy) and its low-cost version in PVC (read A Wing Chun wooden dummy like in PVC): it is time to explain how to build a professional one.
Note – This article has been asked by one of our Core Course practitioners on Patreon (see how to attend our home study classes here Learn Kung Fu online: a beginner-to-expert course).
These training tools are usually quite expensive but for those with good DIY skills (and time to dedicate), the construction process is not incredibly difficult.
How to build the Wing Chun’s training dummy
What we need
Important premises
Before starting:
- We must understand that when working with these tools it is easy to get hurt, let’s be careful and let’s take all the necessary precautions (and possibly let’s ask for advice from an expert)
- If we are minors we must ask for the supervision of an adult
- The type of wooden dummy we are going to describe is the one that must be attached to the lateral supports (as shown in the image)
- …
The work tools
A note by Master Kongling – We exclude professional / mechanical work tools but if they are at our disposal (and we are able to use them), they are obviously the best choice.
These are the basic tools we need:
- Brush
- Chisels
- Dressmakers tape
- Drill
- Drill bit
- File
- Lacquer
- Mallet
- Pencil
- Rasp
- Sandpaper
- Saw
- Straight edge
- …
A note by Master Kongling – For better results, let’s always opt for well-sharpened tools but again, be careful.
The building materials
For all the components of our dummy, the rule is to opt for pieces of wood:
- With a diameter 25-50mm bigger than the one we will need (considering raw lumber)
- With a diameter 5-10mm bigger than the one we will need (considering clean lumber)
The body:
- The ideal wood of the core part (the log) is teakwood but it is not necessarily the best possible choice (for example we could opt for pinewood)
- The idea is to find a wood that is not too hard to work and not too soft (it has to remain rigid)
- The easiest thing is to buy a cylindrical piece of wood already prepared but if we want, we can even start from a tree (not recommended for the less experienced)
- …
The 3 arms:
- Because of the stress they will inevitably be subjected to, they must be made of good-quality hardwood (oak, teak, maple, etc.)
The leg:
- It should be made of hardwood
- If we are lucky enough to find a rather thick curved branch (at about 125-145°) to work it is perfect
- If we cannot find the right branch we will have to solidly assemble more parts (we will see how in another tutorial)
A note by Master Kongling – The best thing to do is to go to specialized shops and ask for advice. This will save us from working the wrong wood (resulting in splits, unexpected breaks, etc.). Another thing to say is that, if we are serious about this project, let’s opt for high-quality materials only: a well-made wooden dummy can last a lifetime.
The measures of the wooden dummy
The correct references
The first thing to stress is that a wooden dummy and its compositive parts should not be positioned at the same height for all the practitioners: they should be adjusted in relation to the student who will use it.
This, however, does not mean that we must be precise at the millimeter but generally speaking, that if we imagine a standing person (at attention):
- The upper part of the log should be at a height similar to the one of the practitioner
- The 2 upper arms holes should be at the height of the shoulders
- The central arm hole should be at the height of the elbow
- The leg hole should be at the height of the middle point of the femur
- The crease of the leg should be at the height of our knee (but this is less relevant)
A note by Master Kongling – This to say what? Simply that if we are much higher or much lower than the average (even if the final structure can be eventually repositioned), we have to manually review the measurements in terms of proportion rather than absolute values. In any case, it is not the maniacal precision of the measurements that makes the training tool more effective.
The “canonical” measures
Each school (if not each builder) claims to apply the original / traditional measures, actually, each of them applies small variations; the secret is to focus our adjustments on:
- Training effectiveness (specifically for what we want to do)
- The structural strength of the wooden man (even considering the eventual cracks of the wood)
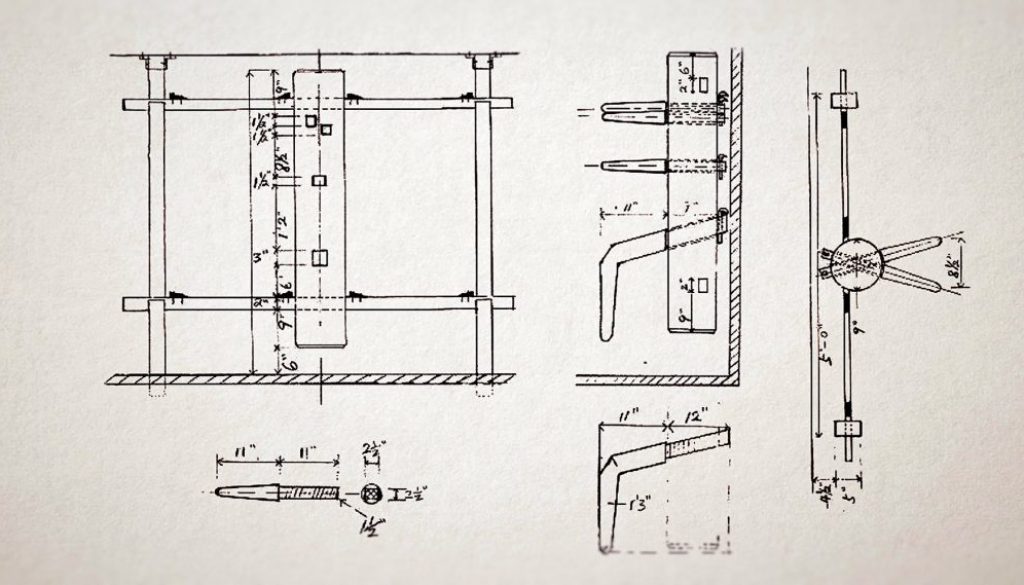
Let’s see the measures of the finished dummy (considering the version with the 2 lateral support).
The body:
- 138cm – Log height
- 20.5cm – Log diameter
- 26cm – Distance from the top of the log and the higher arm’s hole
- 5cm – Side of the hole (a square) of each of the 3 arms
- 2,5cm – The vertical and horizontal distance between the 2 upper arms’ holes
- 57cm – Distance from the top of the log and the lower arm’s hole
- 104cm – Distance from the top of the log and the leg’s hole
- 6cm – The base of the hole (a rectangle) of the leg
- 7cm – The height of the hole of the leg
The arms:
- 57cm – The total length of each arm
- 30cm – The outer conical part of each arm
- 27cm – The internal squared part of each arm
- 3,7cm – The side of the squared base of each arm
- 6,4cm – The diameter of the base of the cone part of each arm
- 4cm – The diameter of the largest part of the rounded tip of the cone part of each arm
- 3,4cm – The distance from the hole for the fixing screw and the end of the internal part of the arm (the part that protrudes behind)
- 22cm – The distance between the tips of the 2 upper arms
The leg:
- 28cm – The length of the external upper part of the leg
- 46cm – The length of the external lower part of the leg
- 28cm – The length of the internal part of the leg (the one that enters into the log)
- 8cm – The side of the base of the squared section of the external part of the leg (upper and lower part)
- 5,3cm – The base of the rectangular section of the internal part of the leg
- 6,3cm – The height of the rectangular section of the internal part of the leg
- 4cm – The distance from the hole for the fixing screw and the end of the internal part of the leg (the part that protrudes behind)
The angles:
- The leg knee is bent at 135°
- The leg hole is inclined toward the ground by about 15-20°
- The arms’ holes are parallel to the ground
The building details:
- The 2 upper arms have a square base with one side attached to the circumference’s base of the cone
- Only the central arm has a square base at the center of the circumference’s base of the cone
- The central arm, the leg and the small square that separates the 2 upper arms are aligned on the same center line
Final notes
A few conclusive thoughts:
- If we are martial arts beginners, let’s deeply think about buying or building a wooden dummy, it is better to start to make some tests with a PCV version (much less demanding but useful to have an idea of what is possible to do with such a training tool, read How to build a Wing Chun wooden dummy in PVC)
- In Wing Chun’s conception, the one with the wooden dummy is an intermediate-advanced level practice; let’s never forget that it is the fact of having the necessary martial knowledge that makes this tool useful and not the simple fact of owning it
- If we have no manual skills in woodworking we must necessarily get help from an expert, alternatively, let’s opt for equally effective but more accessible training dummies (read All the training dummies)
- In 6 Dragons Kung Fu, before arriving at the wooden dummy, we start to train with a simple pole (read Basic Kung Fu exercises: Poles Training)
- …
In the next articles of this series, we will see how to work the wood, the various methods of support and the leg’s building methods.
In-depth video courses
- DIY training tools for martial arts – A video course about how to build all the most important training tools of 6 Dragons Kung Fu
- Basic 6 Dragons Kung Fu Exercises – A visual explanation of the fundamental 5 exercises you need to build real martial skills
In-depth articles
- 5 wooden dummy drills / exercises ideal for beginners – A selection of training drills to apply with the wooden dummy
- A reactive PVC wooden dummy – A training dummy capable of “reacting” to the practitioner’s action
Questions
Reply in the comments and share your experience:
- Have you ever built something with wood?
Author: Master Kongling
Founder of 6 Dragons Kung Fu.How to master 6 Dragons Kung Fu?
Are you searching for:
- Daily training exercises?
- Synthetic theory and concepts?
- A step by step path from white to black belt?
- A path (clear, consequential and gradual) designed to build real martial skills?
- A direct contact with Master Kongling?
Go to our Patreon page and choose a training plan: starting from the Practitioner level, you will gain access to all this and much more.
Inside each Premium Lesson, you will receive the same teaching (practices, tips, concepts, small secrets and corrections) reserved to the live students of Master Kongling.
Important - Once a certain number of registrations are reached, no other participants can be accepted. For more information write to: [email protected].


: rules, respect and etiquette")

