How to make a PVC Nunchaku
A low cost training DIY Nunchaku
In 6 Dragons Kung Fu, the Nunchaku is an important training tool (read Starting with the Nunchaku) and beyond the fact that we may have or not the goal of learning it in depth:
- Its use represents a fundamental conditioning step for the muscle memory of our limbs; it teaches us to move in a clean, fast and relaxed way (about the liquid state read also 6DKF’s interactions: from the strong blow to the light touch)
- It helps us to improve the precision of our spatial intelligence (read The most important skill in combat) and timing
- It allows us to practically learn the 6 Dragons Kung Fu’s soft touch skill (read How to acquire the Soft Touch skill)
- …
Note – This article has been asked by one of our Core Course practitioners on Patreon (see how to attend our home study classes here Learn Kung Fu online: a beginner-to-expert course).
Substantially, to have, at least a training version of this martial weapon is incredibly useful (read also ): so, let’s see how to build our PVC Nunchaku.
A note by Master Kongling – Naturally, as we said, this is only a basilar training version of a very complex weapon: let us not delude ourselves that we are able to handle a real Nunchaku just because we can manage such a light substitute. To learn the use of a real martial weapon the path is very long: it is described here, in this mini-guide Learning the use of weapons.
How to build a Nunchaku
Why a DIY Nunchaku?
Contrary to the real ones, the training versions of the Nunchaku are all (tendentially) “low cost”, easy to find and relatively “well” built: why should we waste time to make one by ourselves?
These are the possible reasons:
- To create a tool with specific characteristcs (eg. not all Nunchaku have the same length, size, etc.)
- To create a more resistant tool (the typical limitation of the commercial ones is that they break very easily and that therfore they cannot be used against any rigid or even semi-rigid surface)
- To add particular structural details useful for specific advanced workouts (eg. a bigger weight, etc. but this is a more advanced topic that we will discuss in another tutorial)
- Because we want to better understand its functionality
- Because we need a lot of them
- Because in certain areas of the world even such an apparently “low” cost is not within our reach, or more simply, because we cannot find it
- …
What we need to start
We need:
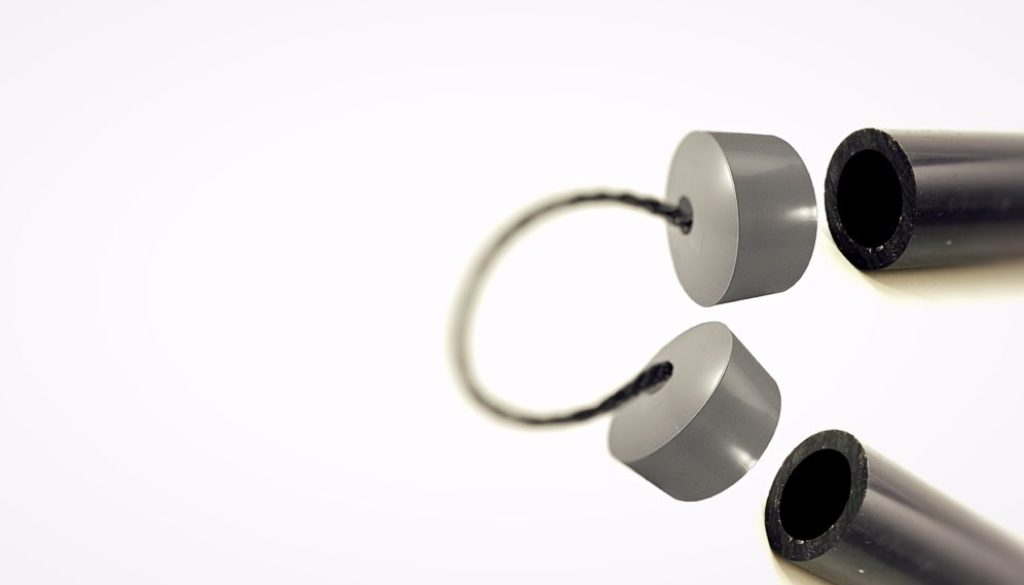
- 2 PVC tubes (each of 20-30 cm of length, 2-3 cm of diameter and 0.4-1 cm of tube thickness)
- 4 PVC end caps (able to be precisely fixed to the PVC tubes)
- 1 good quality nylon cord of about 40-50 cm of length and 0.4-0.7 cm of diameter (eventually we can cut it)
- A strong type of glue able to paste the PVC and/ or 2 small spacer screws
A note by Master Kongling – When we say “PVC”, we do not refer forcibly to specific material, but to something that is enough “elastic” to resist a middle-intensity blow against a compact surface and that, at the same time, is enough rigid to remain perfectly straight.
The wrong materials to avoid:
- Too rigid materials (this is a training tool, no wood, metal, etc.)
- Non-hollow materials
- Materials harmful to health
The (indicative) measures
In this case, we are not going to create a professional tool, so the measures are more “generic”:
- Total length of the Nunchaku (extended in line=: 60-80 cm
- Total length of the flexible part (extended in line): 12-20 cm
- Length of each single rigid part: 20-30 cm
A note by Master Kongling – In our school, for this specific purpose, the ideal total length of the Nunchaku should be around 75 cm (the same as the short stick, read The basic equipment for training in 6DKF): the length of the flexible part can freely vary but for a beginner, it should be around 12-14 cm.
The assembly
The steps:
- Let’s put 2 end caps on 2 tubes (1 each)
- Let’s take the other 2 end caps and let’s create 1 central hole each (it must be slightly larger than the diameter of the nylon string, precise and regular, in fact, if its internal walls are not perfectly smooth, the string will wear out very quickly)
- Let’s insert the cord (doubled) into the 2 end caps (maintaining them rotated in such way that the the holes in their upper part look themselves)
- Let’s create a triple knot inside the end cap where the closed part of the rope passed (we must create a mass large enough to prevent the string from exiting the hole in any way)
- Once measured the desired visible part of the double cord, let’s create another triple know inside the second end cap
- Let’s cut the useless part of the cord and let’s test the strength of the flexible structure
- Let’s finally fix the remaining end caps, respectively, on the 2 tubes
How to fix the end caps:
- We can use the glue to paste the end caps to the tubes
- If we want to be more sure we should laterally drill the end caps and the tubes (while the Nunchaku is already mounted) and insert the 2 spacer screws
Variants
- To avoid screws, eventually, we could also try to make or use tubes and end caps with a thread
- If we want to build a Nunchaku that can be used even for sparring (read Sparring with Nunchaku), we could choose PVC pipes with a smaller diameter (and possibly a slightly greater thickness), so as to be able to fit between the 2 end caps a foam pipe of the thickness we prefer (generally 0.4-0.7 cm)
- …
Final notes
A few conclusive thoughts:
- To try to build our training tools (as for example were used to do the ancient shinobi, read Ninja (shinobi): who they were and how they acted) is an experince to try, because it helps to better understand their mechanics
- One of the incredibly positive aspects of such low cost training tools is that if they break or don’t fully meet our needs, we can always rebuild them
- The original idea comes from one of our subscribed members (Yakaa); this is our adaptation (we have tried to make the structure more solid and we have given more precise measures)
- …
This Nunchaku does not fully respect the traditional characteristics, in the next tutorial of this series, we will see how to build a real one.
In-depth video courses
- DIY training tools for martial arts – A video course with step by step instructions to build your own training tools
- Basic 6 Dragons Kung Fu Exercises – The core technical exercises to develop the martial skills of 6 Dragons Kung Fu
In-depth articles
- A Wing Chun wooden dummy like in PVC – A test version of the famous Wing Chun’s wooden dummy
- How to make a punching bag with tires – How to build a low cost but high performing boxing bag
Questions
Reply in the comments and share your experience:
- Is your DIY Nunchaku stable?
Author: Master Kongling
Founder of 6 Dragons Kung Fu.How to master 6 Dragons Kung Fu?
Are you searching for:
- Daily training exercises?
- Synthetic theory and concepts?
- A step by step path from white to black belt?
- A path (clear, consequential and gradual) designed to build real martial skills?
- A direct contact with Master Kongling?
Go to our Patreon page and choose a training plan: starting from the Practitioner level, you will gain access to all this and much more.
Inside each Premium Lesson, you will receive the same teaching (practices, tips, concepts, small secrets and corrections) reserved to the live students of Master Kongling.
Important - Once a certain number of registrations are reached, no other participants can be accepted. For more information write to: [email protected].


: rules, respect and etiquette")
February 4, 2022 @ 2:56 pm
I have sent to you the photo of my 2 pvc nunchuks!
February 8, 2022 @ 6:03 pm
Received, fantastic, only 1 tip: try to make the 2 parts exactly the same length
May 15, 2022 @ 5:54 am
Fantastic!!